Today I got a request from a colleague of mine that was doing inventory: What are the make, model, serial number and purchase date of your monitors?
Seeing as this wasn’t something I had readily in my head I had to figure it out, but being the automation enthusiast that I am, I refused to bend over my monitors and snap a photo of it all. I wanted to find it a cooler way, the powershell way
This information is stored in WMI, so all I had to do was to grab it using Get-WmiObject and then format it rather nicely for him.
The powershell script I came up with isn’t my most beautiful work, but here it is:
A while back we migrated from our old EMC VNX to a new HPE 3PAR array. It all went fine but what kinda slipped our mind is that HPE’s best practice is to create a custom SATP rule that uses RoudRobin as path selection policy and a IOPS limit to 1 in stead of the default 1000.
The steps are documented in the HPE 3PAR VMware ESX/ESXi Implementation Guide, but they only show you how to do it through the esx cli.
If you have more then a few esx hosts you would be better of using the Get-EsxCli cmdlet. That way you can put it in a script that loops through all your esx hosts. Another thing to keep in mind is that the SATP rules are case sensitive and HPE is using the wrong case for the vendor parameter (3pardata in stead of 3PARdata), at least as of the writing of this post.
The script I wrote will loop through all esx hosts and if the custom rule doesn’t exist it will create it. In our environment the script only took about 2 minutes (on around 100 hosts).
Here’s the script:
$progress = 1
$esxList = Get-View -ViewType hostsystem -Property name | Sort-Object name

foreach ($esx in $esxList) {
 Write-Progress -Activity "Checking SATP rules" -Status "Working on $($esx.name)" -CurrentOperation "Getting EsxCli" -PercentComplete ($progress/$esxList.count*100)
 try {
 $EsxCli = Get-EsxCli -VMHost $esx.name
 }
 catch {
 $Error[0]
 Write-Host "Failed to get EsxCli, see above error" -ForegroundColor Red
 }

 Write-Progress -Activity "Checking SATP rules" -Status "Working on $($esx.name)" -CurrentOperation "Got EsxCli" -PercentComplete ($progress/$esxList.count*100)

 Write-Progress -Activity "Checking SATP rules" -Status "Working on $($esx.name)" -CurrentOperation "Checking if rule already is present" -PercentComplete ($progress/$esxList.count*100)
 if (!($EsxCli.storage.nmp.satp.rule.list() | Where-Object {$_.description -contains "HP 3PAR Custom iSCSI/FC/FCoE ALUA Rule"})) {

 Write-Progress -Activity "Checking SATP rules" -Status "Working on $($esx.name)" -CurrentOperation "Creating rule" -PercentComplete ($progress/$esxList.count*100)
 try {
 $EsxCli.storage.nmp.satp.rule.add($null,"tpgs_on","HP 3PAR Custom iSCSI/FC/FCoE ALUA Rule",$null,$null,$null,"VV",$null,"VMW_PSP_RR","iops=1","VMW_SATP_ALUA",$null,$null,"3PARdata") | Out-Null
 }

catch {
 $Error[0]
 Write-Host "Rule creation failed on $($esx.name), see error above" -ForegroundColor Red
 }

Write-Host "Rule created on $($esx.name)" -ForegroundColor Green

}

else {
 Write-Host "Rule already exists, skipping" -ForegroundColor Yellow
 }

 $progress++
 }
Lately, I’ve had the pleasure of using Powershell to automate some of the basic tasks we do on our HPE 3PAR systems: creating volumes, adding them to volume sets, exporting them and so on.
Since my experience with REST APIs was rather limited it was quite daunting at first but once you get the hang of how REST works and the Invoke-RestMethod cmdlet it’s really not that bad.
Disclaimer: The examples below will vary somewhat in how I do certain things, simply because I had to learn all this from scratch. Hence, the first examples will sometimes do things “less correct” than the later examples since this also was quite the learning curve for me.
The first step in doing anything with the REST API will always be to create a session key. If you’re not familiar with APIs, think of a session key as username and password combined into one string. You will need to add the session key to every REST call you do later on in order to authenticate yourself.
To create a session key from powershell you can use the following line:
The above example will create a datastore named “3parDatastore01” in the cpg named “SSD_r5” with 2TB of space and dedupe enabled. As you can see our session key is passed in the header as X-HP3PAR-WSAPI-SessionKey.
If your well versed in JSON and powershell you can probably tell that I’m not The body you’re sending in the REST call is supposed to be formatted as a JSON object and in the above example I’m creating the JSON object manually by building it up as a string. In a later example I’ll show a more “correct” way to do it.
The next step will usually be to export the volume or to add it to a volume set. Let’s look at an example where I add a volume to an existing volume set:
Again, I’m building the JSON object as a string here instead of doing it the correct way.
The above example will add the volume called “3parDatastore01” (which we created in the previous example) to the existing volumeset called “testVVSet”. If you already have exported the volume set to a host or host set it is now available for the host(s) to use.
The next step for me now was to query the created volume since I had to find the wwn of the volume. There are two ways I have done this: By querying all volumes and by querying a single volume.
To query all volumes you can use this line:
Invoke-RestMethod -Method get -Uri "http://<3PAR ip/hostname>:8008/api/v1/volumes" -Headers @{'X-HP3PAR-WSAPI-SessionKey'=$key} -ContentType "application/json"
To query a single volume you can use this line:
Invoke-RestMethod -Method get -Uri "http://<3PAR ip/hostname>:8008/api/v1/volumes/<volumename>" -Headers @{'X-HP3PAR-WSAPI-SessionKey'=$key} -ContentType "application/json"
You can also build a query directly in the uri you’re accessing by adding ?query=”<your query>” after /volumes. Here’s an example from HPE’s own guide:
https://<storage_system>:8080/api/v1/volumes?query=”wwn EQ value1 OR wwn EQ value2 OR userCPG EQ value3 OR snapCPG EQ value4 OR wwn EQ valueN”
Of course, you can also do filtering in powershell if you’re more comfortable with that (I know I am) but then you will have wasted computing power on both the SAN and the machine you’re running powershell on
Bonus:
If you’re running vmware you can now use powercli to create the datastore. Example:
This will query the REST API for info on the volume named 3parDatastore01 (which we created earlier), start a rescan of all HBAs and then create a datastore with the same name as the volume.
You can test without the Start-Sleep, but in my case it was needed.
If you are not using volume sets and exporting those to hosts, the next logical step would be to export the newly created volume to a host or hostset. To export a volume to a single host you can do something like this:
Notice the difference in the way I format the body? This is the more correct way to do it, creating a hashtable and converting it to JSON with ConvertTo-Json. I also create the header before the Invoke-RestMethod line here.
The example above will export 3parDatastore01 to esx01 with a lun id of 255.
Lastly, I would like to provide you with an example on how we create our boot luns. This is an extract of a powershell function I wrote, in the original function there’s a lot more automation, error handling and logging but I removed it here for the sake of readability.
Seeing that line and realizing how simple it was, it got me thinking on how I could implement this in my scripts.
The only issue I saw with that one-liner was that the passwords it creates do not necessarily comply with high complexity rules.
So, how can we approve on this?
Firstly, we need to create a regex that we can use to validate that the password created complies with our rules.
In our environment this means 12 characters, uppercase, lowercase and either a number or special character.
The regex I ended up with is this one: ^.*(?=.{12,})(?=.*\d)(?=.*[a-z])(?=.*[A-Z])(?=.*[@#$%^&+=]).*$
(which I found here: https://nilangshah.wordpress.com/2007/06/26/password-validation-via-regular-expression/ )
Now that we have our regex we can simple throw the one-liner into a while loop:
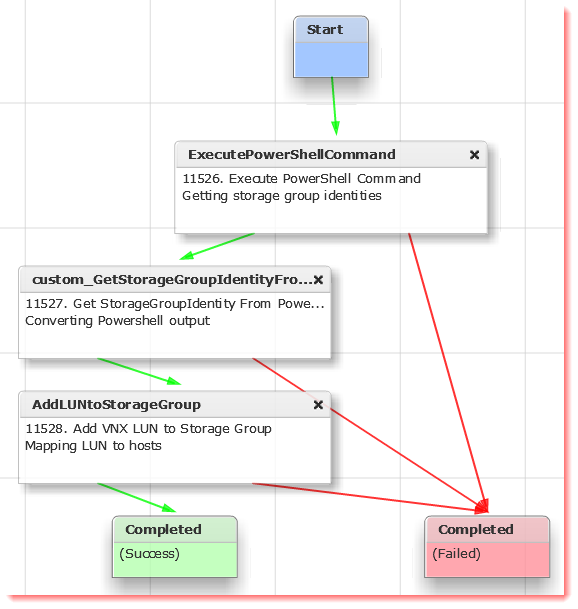
I have been struggling for quite some time with mapping luns from our vnx 5600 to entire clusters in our vCenter. We used to utilize a custom workflow a consultant wrote for us, but that workflow got borked after an update to UCS Director nearly a year ago.
Revisiting the issue i found this example from Cisco: https://communities.cisco.com/docs/DOC-57382
That example seems to work for other people but in our case the custom task in it never gave the correct output, so I had to look for a way around it.
The solution I came up with is overly complicated and can surely be simplified, but my lacking knowledge of javascript limits me quite a bit. My workflow to map luns to vSphere clusters consists roughly of these steps:
A powershell task running a script that does the following:
Queries vCenter for esxi hosts in given cluster
Queries UCS Directors api for a report on storage groups
Putting together a storage group identity for each esxi host
Returning all storage group identities in a comma separated matter
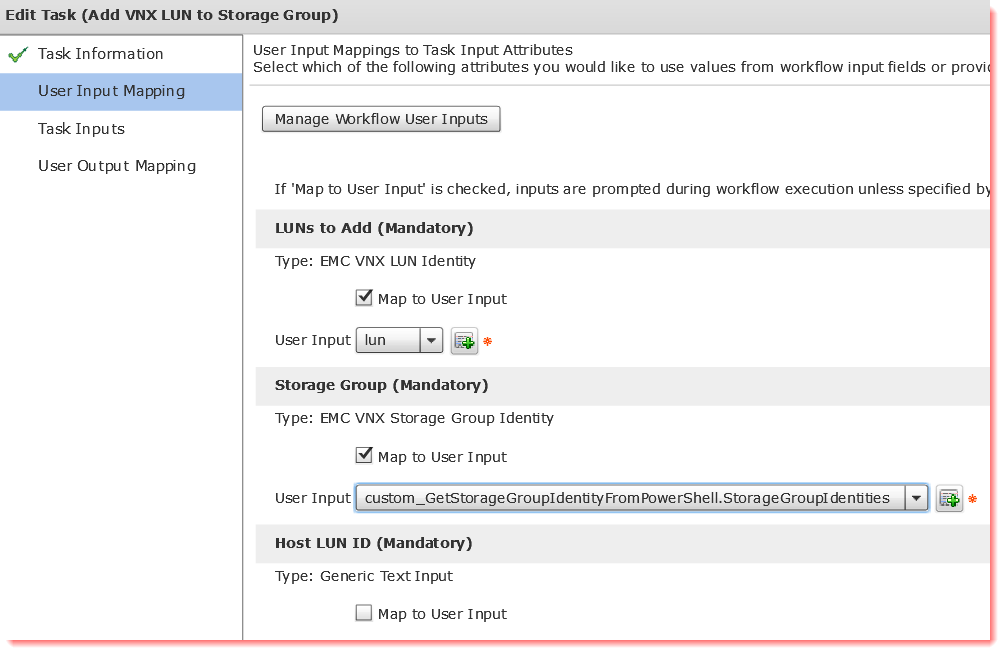
A custom task to parse and convert the output from the powershell task to an output of the emcStorageGroupIdentity type
The only difference is the name and type of the output.
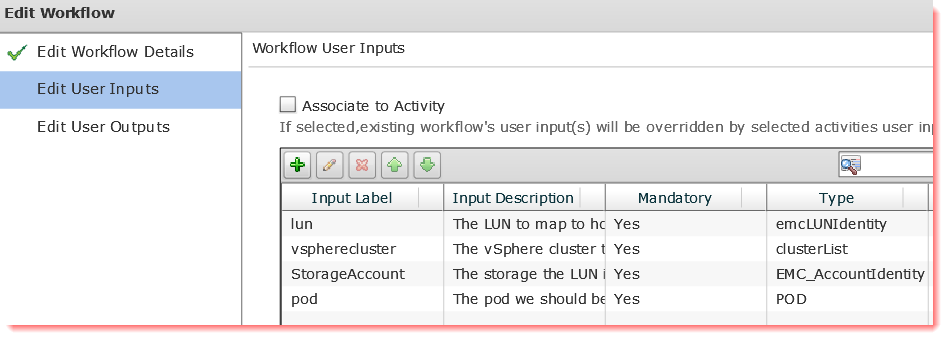
Now, let’s look at the workflow user inputs:
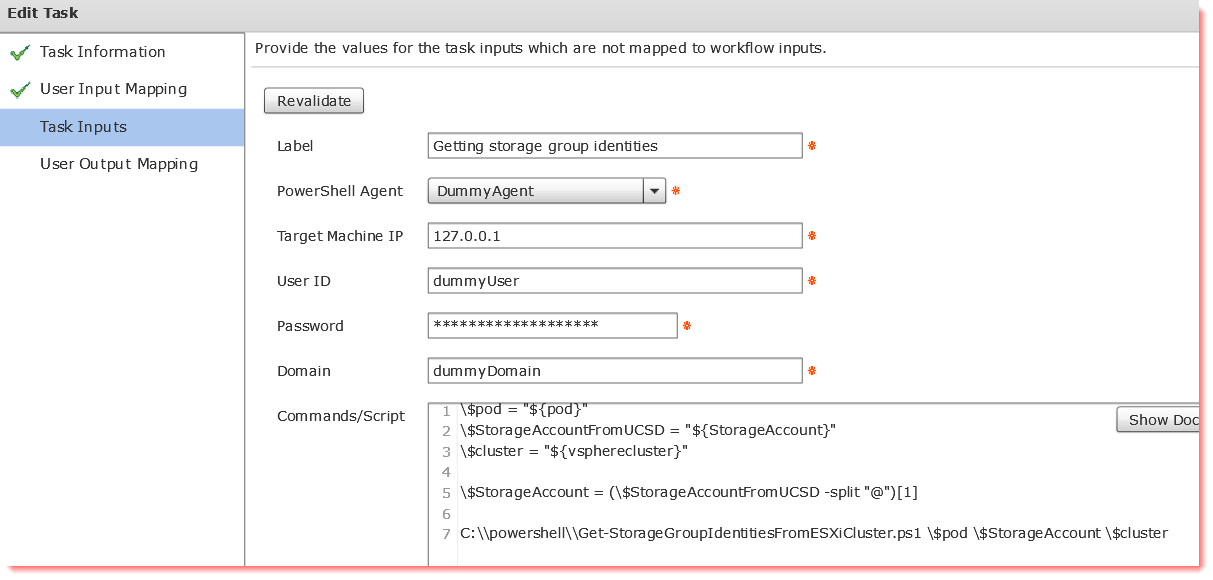
In this workflow I haven’t configured any outputs, so let’s move along to the first task: the powershell task.
The reason I have to do a split on the StorageAccount input is that in the script I only want the hostname of the storage system. I could just as well have done it within the script itself.
The powershell script looks like this:
Param (
    [Parameter(Mandatory=$True,Position=0)][string]$Pod,
    [Parameter(Mandatory=$True,Position=1)][string]$StorageAccount,
    [Parameter(Mandatory=$True,Position=2)][string]$Cluster
        )
#Add the vmware snapin
Add-PSSnapin vmware*

#Connecting to vCenter
Connect-VIServer vcenter01 -WarningAction Ignore | out-null

#Getting ESXi hosts
$vmhosts = get-vmhost -location $Cluster

#Polling a report on storage groups from UCS Director
$webrequest = Invoke-WebRequest 'https://ucsd01/app/api/rest?opName=userAPIGetTabularReport&opData={param0:"510",param1:"$($StorageAccount);$($Pod)",param2:"STORAGE-GROUPS-T51"}' -Headers @{"X-Cloupia-Request-Key"="ThisIsNotMyAPIKey"}
#Converting the report from json
$convertedData = $webrequest.content | ConvertFrom-Json

#Creating a blank array to store end result in
$VMhostsArray = @()

#Looping through all esxi hosts found
foreach ($vmhost in $vmhosts) {
    $hostname = (($vmhost.name).split("."))[0] #Removing domain name from esxi host name
    $WWN_Name = ($convertedData.serviceresult.rows | where {$_.Name -like "$($hostname)"}).WWN_Name #Grabbing WWN from UCSD report
    $StorageGroupIdentity = "$($StorageAccount);$($Pod);$($WWN_Name);$($hostname)" #Putting together the storage group identity
    $VMhostsArray += $StorageGroupIdentity #Adding the storage group identity to the array
    }

#Disconnecting from vCenter
Disconnect-VIServer vcenter01 -Confirm:$false

#Returning array to console, comma separated
return $VMhostsArray -join ","
On my test cluster with only two esxi hosts, the output looks like this:
After the custom task has converted the powershell output it looks like this in plain text:
My last post described how to get around some issues with using Powershell tasks in workflows. While that post surely enables you to uilize powershell to do stuff for you, what about if you want Powershell to grab stuff for you and return them in a usable matter?
This time I’m going to show you how you can return a string from Powershell and use it further down in the workflow. Cisco has provided an example on how to do that here: https://communities.cisco.com/docs/DOC-58250
The example from Cisco is what I started with, but I have modified it a bit since I didn’t want anything that advanced.
So let’s set the stage:
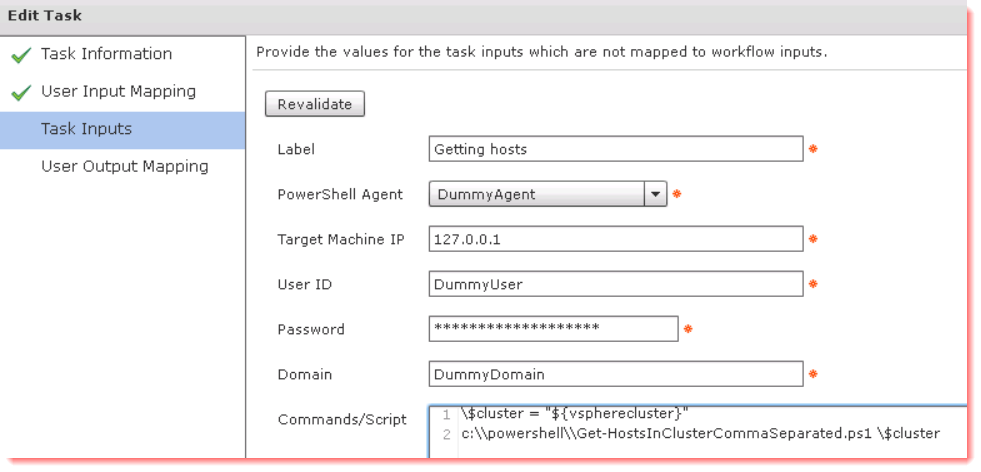
Say you have a workflow that uses the execute powershell command task and you want that task to output something you can utilize further down in the workflow, e.g. sending that output in an email. In this case we will use powershell to give us a comma separated list of esxi hosts in a given cluster.
The workflow has 1 defined workflow user input, vspherecluster, and 1 defined workflow user output, PowerShell_output.
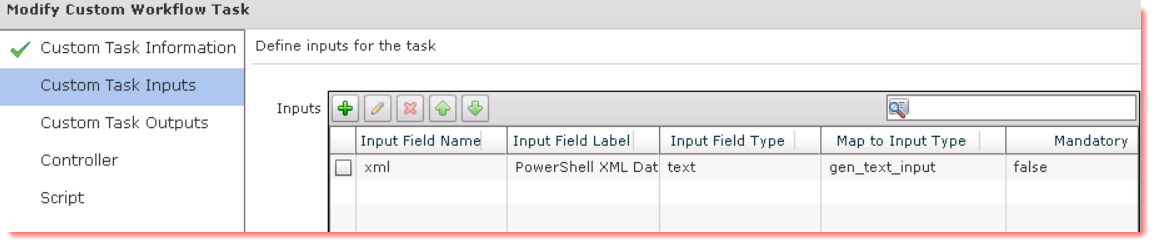
There are a few things we need to get this done:
A powershell script that only outputs one line with all the hosts
A powershell task that runs said script
A custom tasks that parses the powershell output and only returns the string returned by the powershell script
A send email task sending the output
First off, the powershell script:
Param (
 [Parameter(Mandatory=$True,Position=0)][string]$Cluster
 )
#Add the vmware snapin
Add-PSSnapin vmware*

#Connecting to vCenter
Connect-VIServer drt01srv003 -WarningAction Ignore | out-null

#Getting ESXi hosts
$vmhosts = get-vmhost -Location $cluster

#Creating a blank array to put hostnames in
$hostarray =@()

#Looping through all ESXi hosts and adding their names to the array
foreach ($vmhost in $vmhosts) {
 $hostarray += $vmhost.name
 }

#Disconnecting from vCenter
Disconnect-VIServer drt01srv003 -Confirm:$false

#Comma separaing the array and returning it to console
return $hostarray -join ","
The comments should be pretty explanatory, but in essence it connects to vCenter, grabs the name of the esxi hosts in the given cluster and then returns them comma separated.
This works fine and dandy in a powershell console, but the output from the powershell task will look rather different, we’ll look at that in a second. Secondly, the powershell task kicking off the script:
The output from this task will look something like this:
If you’re unfamiliar with how UCS Director handles powershell but familiar with powershell, then that’s probably not what you expected at all.
Now we need to parse that output and return only the string we want. I made a custom task for this, like in the example from Cisco:
Required inputs:
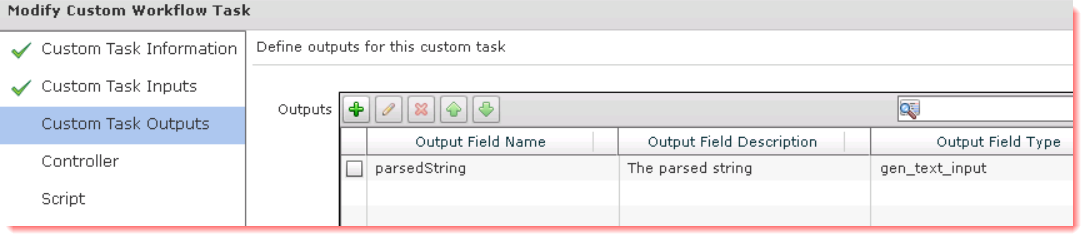
Outputs:
The beauty of doing it like this is that you can create any kind of output type just by changing the output type. I actually use this to create outputs of other types as well, for example vmwareHostNodeIdentity, vmwareClusterIdentity and so on. It’s just easier for me to use powershell to put those kind of outputs together instead of using javascript since I really don’t know javascript.
And then the script:
importPackage(com.cloupia.lib.util);
importPackage(java.util);

var xml = input.xml;

// Try and parse the <Objects>...</Objects> section
var objects_xml = XMLUtil.getValue("Objects", xml);
logger.addDebug("Grabbed objects from xml: "+objects_xml);

// Parse the objects list now (should also be a single section):
object_list = XMLUtil.getTag("Object",objects_xml.get(0))
logger.addDebug("Grabbed object_list from xml: "+object_list);

//Convert object_list to string
list = String(object_list);
logger.addDebug("list: "+list);

// Slice off last xml characters
parsedString = list.substring(30);
logger.addDebug("After removing first characters: "+parsedString);
parsedString = parsedString.slice(0,-10);
logger.addDebug("After removing last characters: "+parsedString);

output.parsedString = parsedString;
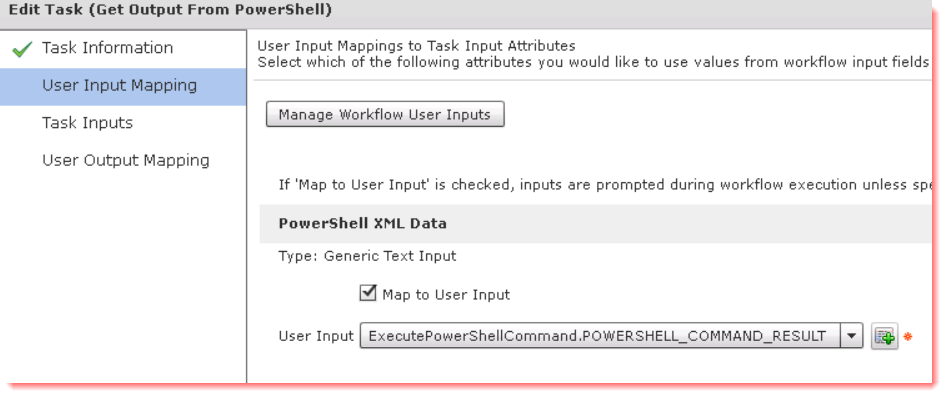
When using the custom task in a workflow I map the input to the output from the powershell task:
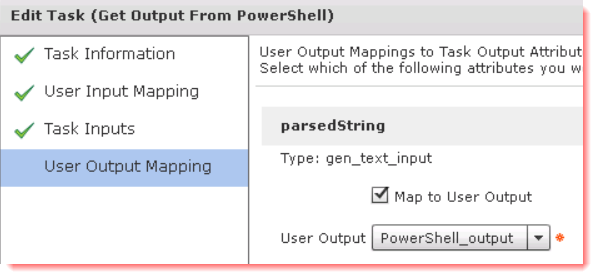
And the output to the defined workflow user output:
Lastly, it’s the send email task which is pretty simple:
While the Cisco PowerShell Agent (PSA) that can be used in UCS Director isn’t exactly perfect, it can still be put to good use. As long as you now how to use it properly
The major issue with using the PSA is that it doesn’t stick around to see if the commands/script was successful or not. As long as it delivered the commands successfully, it’s happy and your workflow will continue to the next step.
Using his approach, I was able get the PSA to stick around until the job finishes. However, I ran into a challenge when I wanted to pass multiple arguments to start-job. The solution I came up with was declaring the UCSD inputs I wanted to use as powershell variables in the script, before calling the start-job cmdlet. So the commands/script input looks like this:
My very first PowerCLI related post was about this same topic: listing snapshot info using PowerCLI.
In my original post (which you can see here) I only wrote a pretty simple one-liner. Which was kind of okay, but it was missing one crucial thing: who took the snapshot?
Why vmware hasn’t found a way to include a username in the get-snapshot cmdlet is something I just can’t understand. There’s really not much code needed to add this to the output, and there’s several ways of doing so.
I found that using Get-Snapshot and Get-VIEvent together was the easiest way to get all the info I want. It’s not a perfect solution, seeing as I really wanted to make use of the much faster Get-View instead of Get-Snapshot, but I have yet to figure out a good way to handle snapshot trees using Get-View.
As usual I created a function for this, Get-Snapshots:
function Get-Snapshots
{
            [CmdletBinding()]
            Param (
                [string]$VM = '*'
                  )

    $collection = @()
    Write-Progress -Activity "Finding snapshots..." -Status "This will tak a while, please wait" -PercentComplete 20 -Id 1 -ErrorAction SilentlyContinue
    $snapshots = Get-Snapshot -vm $VM
    Write-Progress -Activity "Finding snapshots..." -Status "Found all snapshots" -Completed -Id 1 -ErrorAction SilentlyContinue

    $progress = 1
    foreach ($snapshot in $snapshots) {
        Get-VIEvent -Start ($snapshot.Created).addminutes(-5) -Finish ($snapshot.Created).addminutes(5) -Entity $Snapshot.vm.name -Types info -maxsamples 20 | Where-Object {$_.FullFormattedMessage -like "*Create virtual machine snapshot*"} | ForEach-Object {
                Write-Progress -Activity "Finding snapshots" -Status "Working on $($_.Vm.Name)" -PercentComplete ($progress/$snapshots.count*100) -Id 1 -ErrorAction SilentlyContinue
                $object = New-Object PSObject
                Add-Member -InputObject $object NoteProperty VM $_.Vm.Name
                Add-Member -InputObject $object NoteProperty User $_.Username
                Add-Member -InputObject $object NoteProperty "Snapshot name" $Snapshot.Name
                Add-Member -InputObject $object NoteProperty "Snapshot description" $Snapshot.Description
                Add-Member -InputObject $object NoteProperty SizeGB ([math]::Round($Snapshot.SizeGB))
                Add-Member -InputObject $object NoteProperty Time $_.CreatedTime
                $collection += $object
                }
        $progress++
        }

    Write-Progress -Activity "Finding snapshots" -Status "All done" -Completed -Id 1 -ErrorAction SilentlyContinue
    $collection

    <#
     .Synopsis
      Lists snapshots in vCenter
     .Description
      List all snapshots in the entire vCenter
     .Example
      Get-Snapshots
      Lists all snapshots in the vCenter
     .Link
      http://cloud.kemta.net
     #>
}
You can run the function as it is, without any parameters, or you can specify which vm you want to get the snapshots of:
As you can see, the output is a list. If you want it to be more readable for human eyes, I recommend piping it to Format-Table:
If you would rather run this as a script, instead of using the function, here’s the code for that:
That post was written before I truly discovered the major advantages of using Get-View instead of Get-VM, Get-VMHost and so on. If used correctly, there’s a major difference in speed when using Get-View over Get-VM.
When writing this post I checked the differences in speed when using the old way that I linked to above and my new function (which I’ll get to in a second or two..), the result was as follows:
As you can see, the difference is pretty clear. 5 seconds vs. 1.6 minutes…
So, without further ado, I present to you the code for Get-ISOMounts:
function Get-ISOMounts
{
    [CmdletBinding()]
        Param (
            [switch]$Dismount
              )
        $VMs = Get-View -ViewType virtualmachine -Property name,Config.Hardware.Device
        $VMsWithISO = @()
        $progress = 1
        foreach ($VM in $VMs) {
            Write-Progress -Activity "Checking if VMs have ISOs mounted" -Status "Working on $($VM.name)" -PercentComplete ($progress/$VMs.count*100) -Id 1 -ErrorAction SilentlyContinue
            if (($VM | select -ExpandProperty config | select -ExpandProperty hardware | select -ExpandProperty device | select -ExpandProperty deviceinfo | where {$_.Summary -like "ISO*"}) -ne $NULL) {
                $object = New-Object PSObject
                Add-Member -InputObject $object NoteProperty VM $VM.Name
                Add-Member -InputObject $object NoteProperty "ISO mounted" (($VM | select -ExpandProperty config | select -ExpandProperty hardware | select -ExpandProperty device | select -ExpandProperty deviceinfo | where {$_.Summary -like "ISO*"}).Summary).Substring(4)
                $VMsWithISO += $object
                $object
            $progress++
            }
        }
        Write-Progress -Activity "Checking if VMs have ISOs mounted" -Status "All done" -Completed -Id 1 -ErrorAction SilentlyContinue

        if ($Dismount)
            {
            Write-Verbose "Starting to dismount ISOs"
            $progress = 1
            foreach ($VM in $VMsWithISO) {
                Write-Progress -Activity "Dismounting ISOs" -Status "Working on $($VM.name)" -PercentComplete ($progress/$VMsWithISO.count*100) -Id 1 -ErrorAction SilentlyContinue
                Get-CDDrive -VM $VM.Name | Set-CDDrive -NoMedia -Confirm:$False
                }
            Write-Progress -Activity "Dismounting ISOs" -Status "All done" -Completed -Id 1 -ErrorAction SilentlyContinue
            $progress++
            }

<#
 .Synopsis
  Lists all VMs with ISOs mounted, can also dismount them
 .Description
  Lists all VMs with ISOs mounted. If the switch -Dismount is present all mounted ISOs will be dismounted
 .Example
  Get-ISOMounts
  Lists all mounted ISOs in the vCenter
 .Example
  Get-Snapshots -Dismount
  Lists all mounted ISOs on VMs in the vCenter and then dismounts them
 .Link
  http://cloud.kemta.net
 #>
}
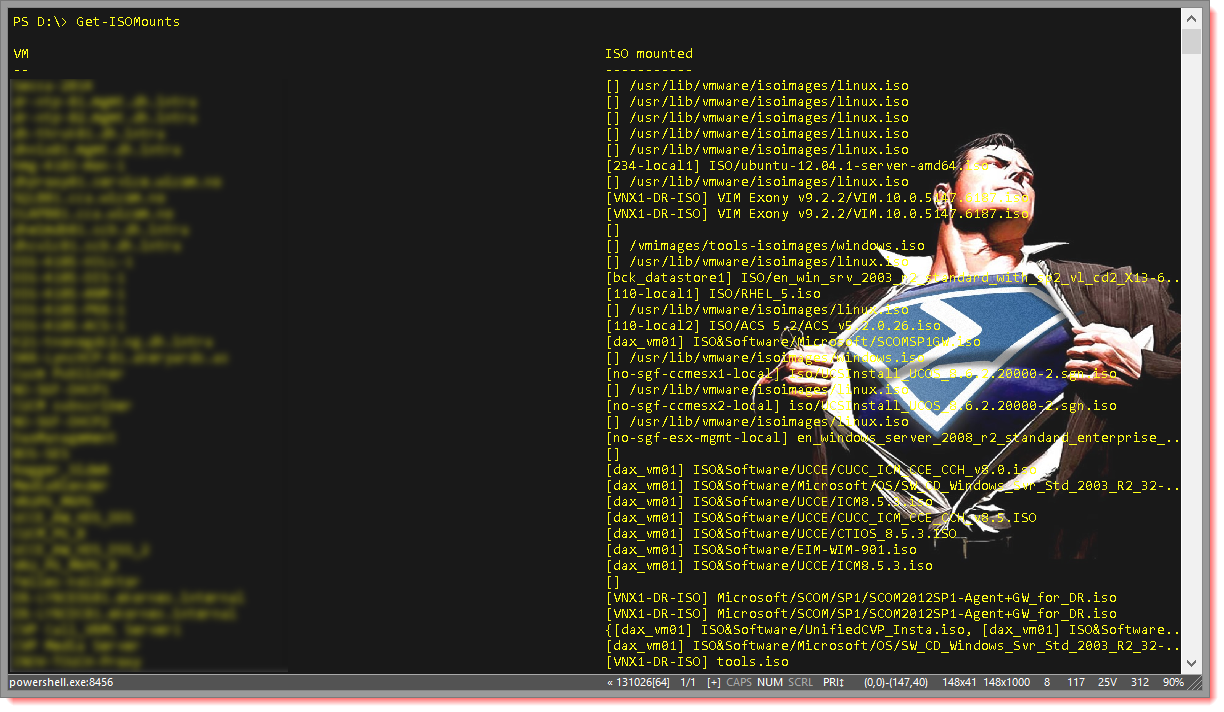
I feel the help section should speak for itself, but I’ll provide you a screenshot none the less. Just running Get-ISOMounts will provide you with an output looking like this:

")