Sometimes it can be useful to know how much space the VMs in a specific folder (or vApp/datacenter) is occupying. For example if you are a hosting provider of some sort and need to know how much space a customer is using.
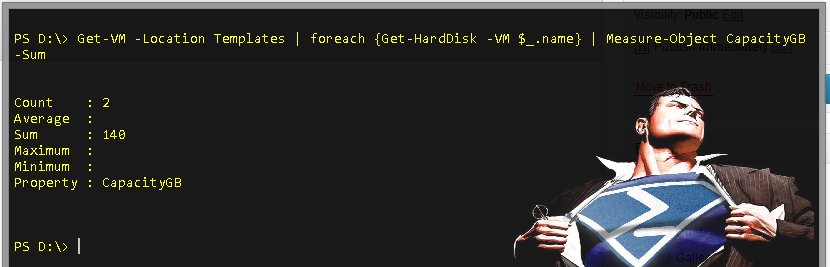
That will give an output that looks something like this:
Meaning, in this case, that the folder named “Templates” has 2 VMs occupying 140GB of disk space
You can also get a list per vm with this one-liner:
This will show a quick progress bar stating that “Something” is going on, the status is “Something else” and it has gotten to 30%. However, when I wanted to use Write-Progress in a large script I quickly got confused when I looked at some of the examples out there. I mean, look at this for example:
$wmiQuery = "Select name from win32_service where state = 'running'"
$colItems = Get-WmiObject -Query $wmiQuery
For($i = 1; $i -le $colItems.count; $i++)
{ Write-Progress -Activity "Gathering Services" -status "Found Service $i" `
-percentComplete ($i / $colItems.count*100)}
$colItems | Select name
I’m sure that if I had a stronger background in programming and/or scripting I could have figured it out quite easily (for what it’s worth: I understand the code now ). But since I haven’t really been scripting before Powershell came along I just sat there scratching my head.
So let’s write a simpler guide!
Let’s start by explaining a briefly how Write-Progress works:
If you type the command in your Powershell console it will display the progress bar, but it will disappear again in a split second.
If you put your Write-Progress snippet in a script, the progress bar will be displayed until another Write-Progress snippet comes along, or until the script finishes.
The basic usage of Write-Progress is, as I wrote further up, something like this:
This will create an output looking something like this:
Cool ey?
Now, this is all fine and dandy as a starting point, and you CAN use write-progress this way in your scripts, but thats not exactly a dynamic way of doing it.
Often in your script you will have one or more foreach loops. Those are a great place to put your write-progress snippet and have PercentComplete and perhaps even Status or CurrentOperation filled out automagically.
First off we will need some data to parse through, I like to use Get-Process for that:
$data = Get-Process
Then we create a variable for our progress and set it to 1:
$progress = 1
This way PercentComplete will start at 1, you’ll see why in a bit.
Now we can create our foreach loop (I assume you know how they work):
This Write-Progress line will show Activity as “Sleeping”, the status will be the name of the process and currentoperation will be the ID of the process. Percentagecomplete will the correct progress (since $progress++ will increment $progress by 1 for each time the loop runs).
Start-Sleep is only there to delay the operation, so you can actually see whats going on.
But, as always, I prefer to make a function of these kind of things. A function is much easier to remember than a bunch of parameters and cmdlets.
So here’s the code for a function that will search through the vCentre for VMs that need disk consolidation:
function Start-Consolidation
{
    [CmdletBinding()]
        Param (
            [string]$Location = '*',
            [switch]$ListOnly
              )

        $VMs = Get-VM -Location $Location | Where-Object {$_.Extensiondata.Runtime.ConsolidationNeeded}

        if ($ListOnly) {
              $VMs
              }

        else {
            $VMs | ForEach-Object {
                Write-Host "Starting disk consolidation on $_.Name"
                $_.ExtensionData.ConsolidateVMDisks()
                Write-Host "Finished disk consolidation on $_.Name"
                                  }
              }
        }
<#
 .Synopsis
  Searches vCentre for VMs in need of disk consolidation and starts disk consolidation
 .Description
  This function searches the entire vCentre, or the given folder,datasenter,cluster,vApp or ResourcePool for VMs that is in need of disk consolidation. It will then start disk consolidation on those that need it
 .Parameter Location
  If you want to narrow the search to a specific folder,datasenter,cluster,vApp or ResourcePool
 .Example
  Start-Consolidation
  Searches the entire vCentre for VMs that need consolidation and starts consolidating them
 .Example
  Start-Consolidation -Location vApp01
  Searches through vApp01 for VMs that need consolidation and starts consolidation on them
 .Link
  http://cloud.kemta.net
 #>
Thats really great, and you can easily extend the one-liner to include more data if you like. But for someone who isn’t comfortable with using PowerCLI yet, it can seem a bit terrifying. Therefore I usually create functions for long one-liners like this one.
A basic function doing the same thing can look something like this:
That way, it enough to type Get-MACAddress 00:50:56:A1:50:43
Or, you can take the time to create a proper function:
function Get-MACAddress
{
 [CmdletBinding()]
 Param (
 [parameter(Mandatory=$True,ValueFromPipeline=$True)][Validatelength(17,17)][string]$MAC,
 [string]$Location = '*'
 )
 Get-VM -Location $Location | Select Name,Folder,PowerState, @{N="Network";E={$_ | Get-networkAdapter | ? {$_.macaddress -eq $MAC}}} | Where {$_.Network -ne ""}
<#
 .Synopsis
 Searches vCentre for the given MAC address
 .Description
 This function searches the entire vCentre, or the given folder,datasenter,cluster,vApp or ResourcePool for VMs using the given MAC address. VMs with the given MAC address will be listed with Name,Folder,PowerState and to which network adapter the MAC address is assigned
 .Parameter MACAddress
 The MAC address you want to search for. Use the following format: 00:00:00:00:00:00
 .Parameter Location
 If you want to narrow the search to a specific folder,datasenter,cluster,vApp or ResourcePool
 .Example
 Get-MACAddress 00:50:56:a4:04:ce
 Searches the entire vCentre for VMs with the mac address 00:50:56:a4:04:ce
 .Example
 Get-MACAddress 00:50:56:a4:04:ce -Location vApp01
 Searches the vApp called vApp01 for VMs with the mac address 00:50:56:a4:04:ce
 .Link
 http://cloud.kemta.net
 #>
}
This more advanced function will allow you to narrow the search, it will check that the mac address you type is the correct length and it provides a little help section that you can call with get-help get-macaddress.
It’s been a while since last update, again, so I figured I should at least provide something..
I recently started in a new job, and one of the first things I looked into was the amount of snapshots in our vmware environments. Not surprisingly there was a lot of snapshots, and very few of them had any hints of when they were taken and why.
The vsphere console doesn’t provide this info so I had to turn to PowerCLI to get the info I needed. PowerCLI is really just a snap-in to powershell so I felt right at home
After you start PowerCLI, you need to first connect to your vcenter server:
Connect-VIServer <vcenter server>
You will be promted for username and password for vcenter. After powershell has connected to the vcenter server, all you need to is run this one-liner:
Today I was presented with a task that sounded pretty boring and repetitive: Install the Windows Search service on all our citrix servers.
Now, I could just log on each and every one of our citrix servers, open Server Manager and then install the role service but where’s the fun in that?
As always Powershell is a lot more fun:
First I had to find the name of all our citrix servers. Luckily we have a strict naming convention so I could just poll Active Directory and store the names in an array:
$servers = Get-ADComputer -Filter 'Name -like "ctx_srv*"' | select name
Next I only had to create a foreach loop that enters a PSSession on each of the servers and install the role service:
The Export-Csv cmdlet is a really nice tool if you want to gather info from e.g. Active Directory that you later want to import to Excel. But as you might have noticed it doesn’t play well with non-English letters.
Working in Norway with users from all the Nordic countries means that we have a lot of users i Active Directory who have non-English letters in their names (æ ø å ö ä and so on). Unless you specify which encoding Export-Csv should use they will show in the csv as ?.
The magical switch to Export-Csv is -encoding. E.g. for us we would use unicode as encoding as this will export the Nordic letters:

") ). But since I haven’t really been scripting before Powershell came along I just sat there scratching my head.
). But since I haven’t really been scripting before Powershell came along I just sat there scratching my head.

